A Korea travel eSIM normally takes only a few minutes to activate, but the correct timing depends on the provider. Some plans can be installed before departure and begin only when they first connect in Korea; others start as soon as installation or data use begins. Read the provider’s activation rule before scanning the QR code.
Information in this guide was verified on June 9, 2026. Plan prices, validity periods, device support, and activation rules can change.
Quick answer
- Confirm that your phone supports eSIM and is carrier-unlocked.
- Buy a plan and keep the QR code or manual activation details.
- Connect your phone to reliable Wi-Fi.
- Add the eSIM through your phone’s cellular or SIM settings.
- On arrival, turn on the Korean eSIM and select it for mobile data.
- Set data roaming according to the provider’s instructions.
- Test a webpage or map before leaving the airport.
Do not delete the eSIM while troubleshooting. Some Korean tourist eSIM profiles can be installed only once and cannot be reissued.
Before buying an eSIM
Check that the phone supports eSIM
The presence of an eSIM menu is a better test than relying on a general model list, because support can differ by country of purchase and device variant.
On an iPhone, open Settings > Cellular or Settings > Mobile Data and look for Add eSIM. Apple states that eSIM support generally begins with the iPhone XS, XS Max, and XR, although regional restrictions apply. See Apple’s current eSIM setup requirements.
On many Samsung Galaxy phones, open Settings > Connections > SIM manager and look for Add eSIM. Menu names vary on other Android devices.
You can also dial *#06#. If the device information includes an EID, the phone contains eSIM hardware. This does not guarantee that every Korean provider supports that particular model. For example, LG U+ currently states that its tourist eSIM does not support Google Pixel or OPPO devices, even if they have eSIM capability. Check the exact provider’s compatibility rules before paying.
Confirm that the phone is unlocked
A carrier-locked phone may reject an eSIM from another provider. On an iPhone, go to Settings > General > About and check Carrier Lock. Apple says an unlocked phone should display No SIM restrictions. Only your existing carrier can remove its lock; Apple cannot do it for you. See Apple’s carrier-lock instructions.
For Android, ask your home carrier whether the device is network-unlocked. Paying off the phone does not always unlock it automatically.
Decide whether you need a Korean phone number
Travel eSIM products fall into three broad groups:
| Plan type | Mobile data | Korean number | Outgoing calls and SMS |
|---|---|---|---|
| Data-only travel eSIM | Yes | Sometimes displayed, but often not usable for calls | No |
| Korean carrier data eSIM | Yes | May include a 010 number for incoming services | Usually no |
| Data, voice and SMS eSIM | Yes | Yes | Usually available after registration or credit top-up |
Do not assume that receiving a Korean number means it can complete Korean identity verification. KT states that its tourist eSIM does not support personal authentication. LG U+ says a voice-enabled tourist product may receive ordinary SMS codes used by some restaurant or taxi services, but it cannot perform formal identity verification for banking or government services.
A data-only eSIM is sufficient for maps, messaging apps, translation, ride-hailing apps that accept a foreign account, and internet calling. Choose a voice-and-SMS plan if you expect accommodation staff, restaurants, delivery drivers, or local contacts to call you.
Read the activation and refund rules
These rules are provider-specific. As verified on June 9, 2026:
- LG U+ tourist eSIMs must be activated within the stated validity period; the displayed data-only product currently says within 60 days of purchase. Its service period begins with first data use.
- KT tourist eSIMs are intended for foreign visitors staying for up to 90 days. KT says the profile is usable only in Korea and warns that it can be installed only once.
- Both providers warn that an installed or deleted profile may be non-refundable and may not be reissued.
Provider pages can contain conflicting notices during product updates. Use the conditions shown on your own checkout page and confirmation email, and keep screenshots of them.
How to install an eSIM on an iPhone
Connect to Wi-Fi before beginning. Keep the QR code open on another phone, tablet, or computer if possible.
- Open Settings.
- Tap Cellular or Mobile Data.
- Tap Add eSIM.
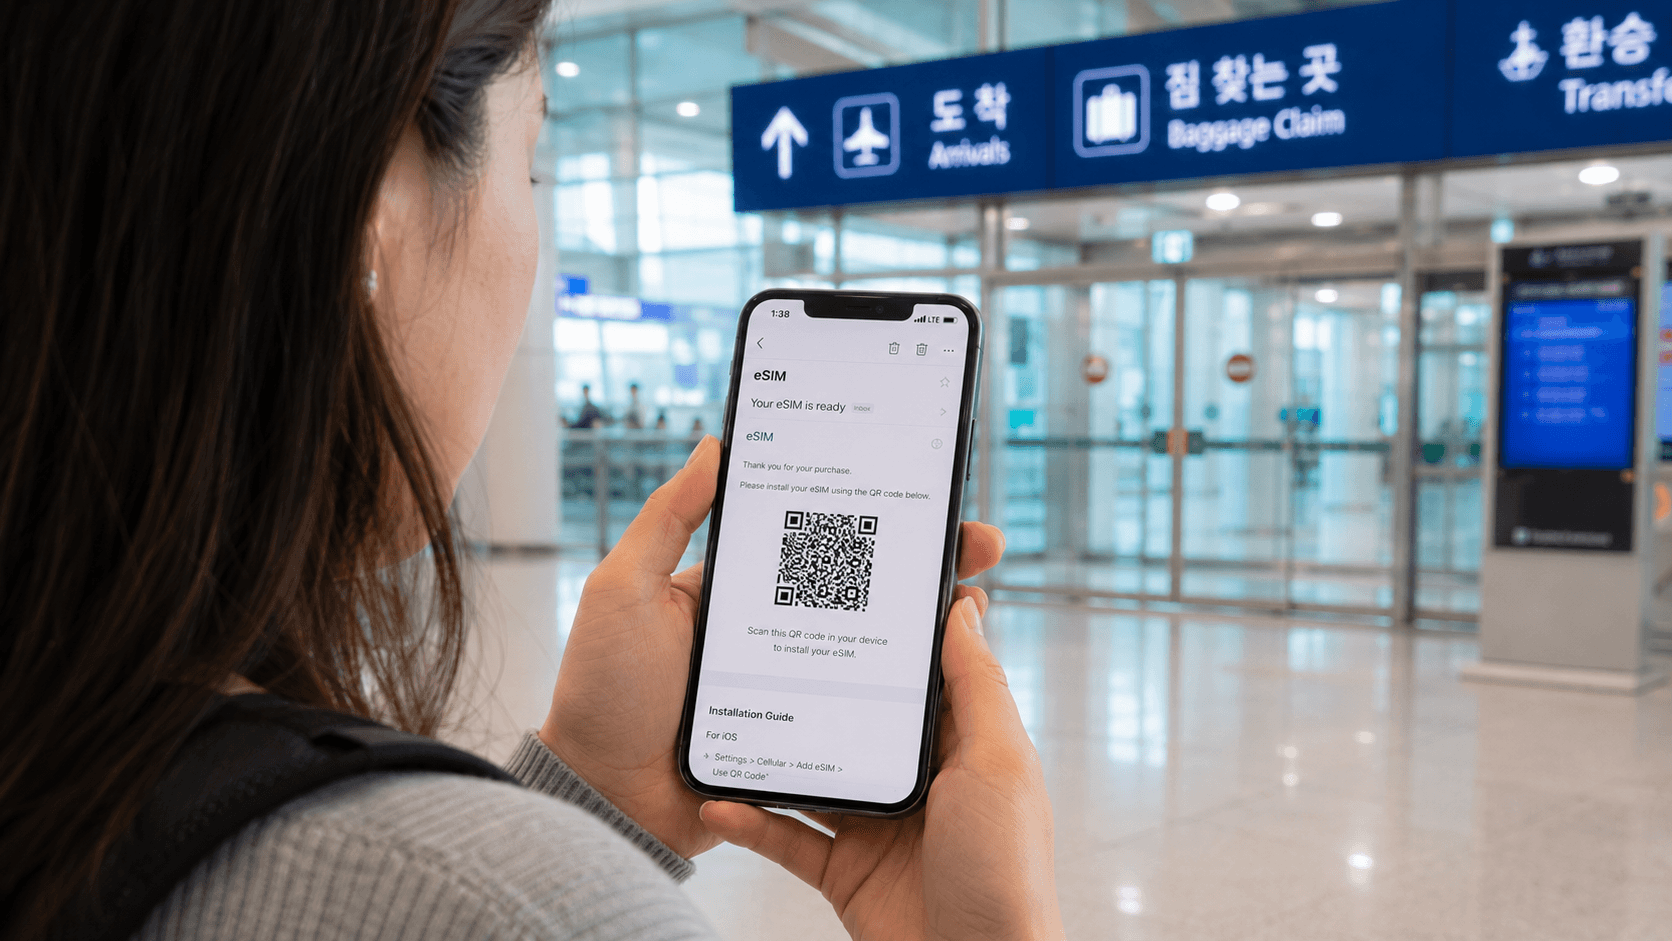
- Choose Use QR Code.
- Scan the provider’s QR code.
- Tap Continue, then Add Cellular Plan when prompted.
- Give the line a clear label such as
Korea.
Apple also allows an eSIM QR code displayed in a supported email app or browser to be added directly on iPhones using iOS 17.4 or later: press and hold the QR code, then select Add eSIM. If the provider supplied an SM-DP+ address and activation code, choose the manual-entry option instead.
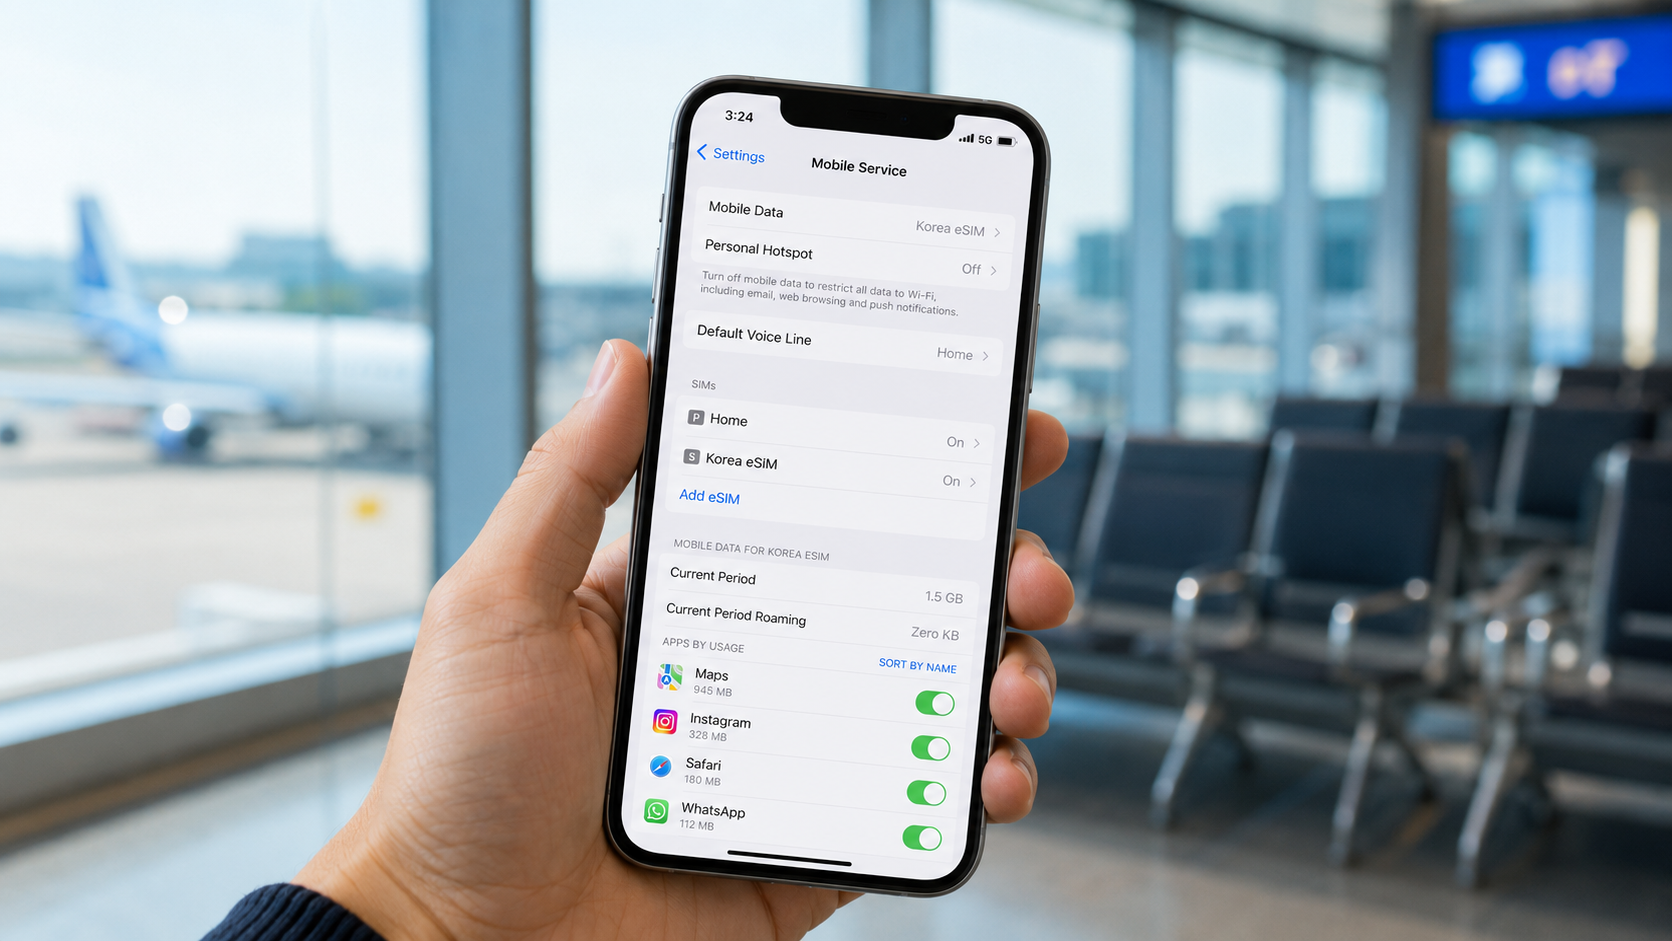
During dual-SIM setup, use these practical settings:
- Default voice line: Keep your home line selected unless the Korean plan includes voice service.
- Cellular data: Select the line labeled
Korea. - Allow Cellular Data Switching: Turn this off to reduce the risk of the phone using paid roaming on your home line.
- Data roaming: Apply the setting required by the eSIM provider. A global travel eSIM often requires it; a direct Korean carrier profile may not.
To avoid unexpected home-carrier charges, open the settings for your home line and turn off Data Roaming. You may leave the line enabled if you need incoming SMS, but ask your home carrier whether receiving calls, voicemail, or SMS abroad incurs charges.
How to install an eSIM on Android
The wording differs by manufacturer and software version. On many Samsung Galaxy devices:
- Open Settings.
- Tap Connections.
- Tap SIM manager.
- Select Add eSIM.
- Choose Scan QR code from service provider.
- Scan the code and approve the download.
- Label the profile
Koreaif the phone offers that option.
LG U+ publishes the same general Android path in its official installation guide. On a Pixel or another Android phone, look under Settings > Network & internet > SIMs or search Settings for eSIM.
After installation:
- Turn on the Korean eSIM.
- Select it as the preferred SIM for mobile data.
- Keep your home SIM as the preferred calling line unless the Korean plan supports calls.
- Disable automatic data switching or backup calling if it could use your home plan.
- Set data roaming exactly as instructed by the eSIM company.
If the QR code is on the same Android phone, open it on another screen. Otherwise, check whether the provider supplied manual activation details or an installation link.
When should you activate it?
The words install, activate, and start using are not always interchangeable.
- Installation downloads the carrier profile to the phone.
- Activation registers that profile with the network.
- Plan start determines when the purchased number of hours or days begins.
A provider may permit installation before departure but start the plan only after the first connection or first data session in Korea. Another provider may begin counting as soon as the profile is installed. Never assume that airplane mode prevents the validity clock from starting.
The safest procedure is:
- Read the confirmation email for phrases such as
install before arrival,activate at destination,starts on first connection, orstarts on installation. - If advance installation is explicitly allowed, install it while you still have reliable internet at home.
- Leave the profile switched off until you arrive unless instructed otherwise.
- If the timing is unclear, contact the seller before scanning the QR code.
Remember that the seller and the network operator may be different. If you bought through a marketplace or international eSIM company, follow that seller’s activation instructions and contact its support team first.
Activating the eSIM after landing in Korea
Once the aircraft has reached the gate and mobile devices may be used:
- Turn off airplane mode.
- Open the phone’s SIM or cellular settings.
- Switch on the Korean eSIM.
- Select it for mobile data.
- Confirm that your home line’s data roaming is off.
- Turn the Korean line’s data roaming on only if the provider requires it.
- Wait one or two minutes for a Korean network name and signal bars.
- Open a webpage or mapping app to test the connection.
If your plan includes voice or SMS, check whether passport or entry verification is required. KT states that some voice and SMS functions require an entry check at a KT airport roaming center. A QR-code installation alone may therefore provide data before all telephone functions become available.
Do not leave the airport until you have tested data. Airport carrier counters can be much easier to use than finding English-language assistance later, although support availability depends on where the eSIM was purchased.
Troubleshooting an eSIM that has no data
Work through these checks in order.
1. Confirm that the correct line is enabled
Open the SIM settings and verify that the Korean profile is turned on and selected for mobile data. A successfully installed eSIM can remain inactive if the line toggle is off.
2. Check the roaming instruction
Turn data roaming on for the travel eSIM if the provider requires it. Do not turn roaming on for your home SIM unless you knowingly intend to use your home carrier abroad.
3. Toggle airplane mode
Turn airplane mode on for about 30 seconds, then turn it off. Apple recommends this step when an iPhone has roaming or network-registration problems.
4. Restart the phone
A restart can force the device to register the newly installed profile. Wait several minutes after it powers on.
5. Check network selection
Automatic network selection is normally correct. If the provider names a specific Korean partner network and automatic selection fails, choose that network manually. Do not select an arbitrary network merely because it appears in the list.
6. Check the APN
An APN, or Access Point Name, tells the phone how to connect to mobile data. Most Korean carrier eSIMs configure it automatically. Enter or change an APN only when the provider has supplied the exact value; guessing can prevent the connection from working.
7. Check the plan’s location and start conditions
A Korea-only profile may not register before arrival. KT explicitly states that its tourist eSIM is available only in Korea. Also confirm that the purchase has not expired and that any seller registration step was completed.
8. Do not delete the profile
Deleting and rescanning is not a normal reset procedure. KT and LG U+ both warn that their profiles may be one-time installations without automatic reissue. Take screenshots of the error, EID, IMEI, order number, and installed line details, then contact the seller.
Resetting all network settings should be a later step because it can remove saved Wi-Fi networks and other network preferences. LG U+ recommends it only as part of troubleshooting when ordinary checks fail.
Common mistakes to avoid
- Buying before confirming that the exact device variant is supported.
- Assuming an unlocked-looking phone is actually carrier-unlocked.
- Scanning the QR code too early without checking when validity begins.
- Expecting a data-only plan to make calls or receive SMS codes.
- Treating a tourist
010number as formal Korean identity verification. - Leaving cellular data switching enabled and accidentally using the home SIM.
- Turning on roaming for the wrong line.
- Deleting the eSIM when it does not connect immediately.
- Discarding the order email before activation is complete.
- Expecting a Korean carrier shop to support an eSIM sold by an unrelated marketplace.
What to check before you go
- The phone has an Add eSIM option or displays an EID.
- The exact model and purchase region are accepted by the provider.
- The device is carrier-unlocked.
- The plan includes the required data, calls, SMS, and hotspot use.
- You know whether a Korean phone number is included.
- You understand that tourist numbers may not support formal identity verification.
- You know when the plan’s validity starts.
- You know whether data roaming must be on or off for the travel profile.
- The QR code, manual activation details, order number, and support contact are available offline.
- You have another screen available for scanning the QR code.
- Your home carrier’s international roaming charges are understood.
Your practical next step is to open your phone’s SIM settings now, confirm that Add eSIM is present, and ask your home carrier to unlock the device before buying a non-refundable plan.