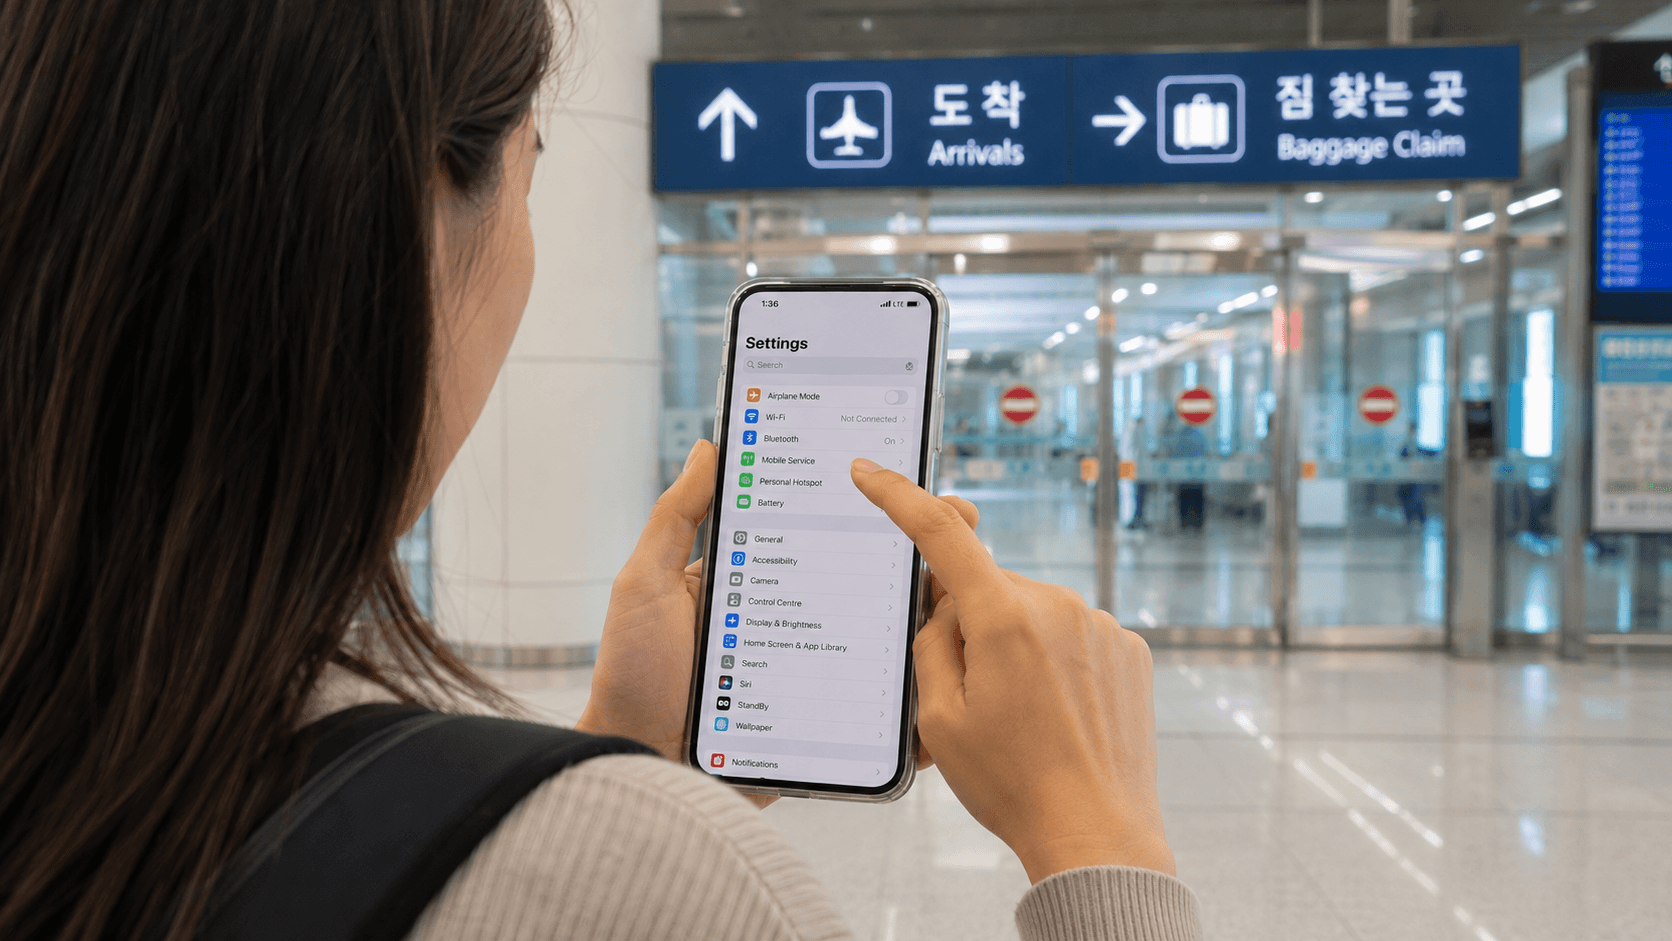
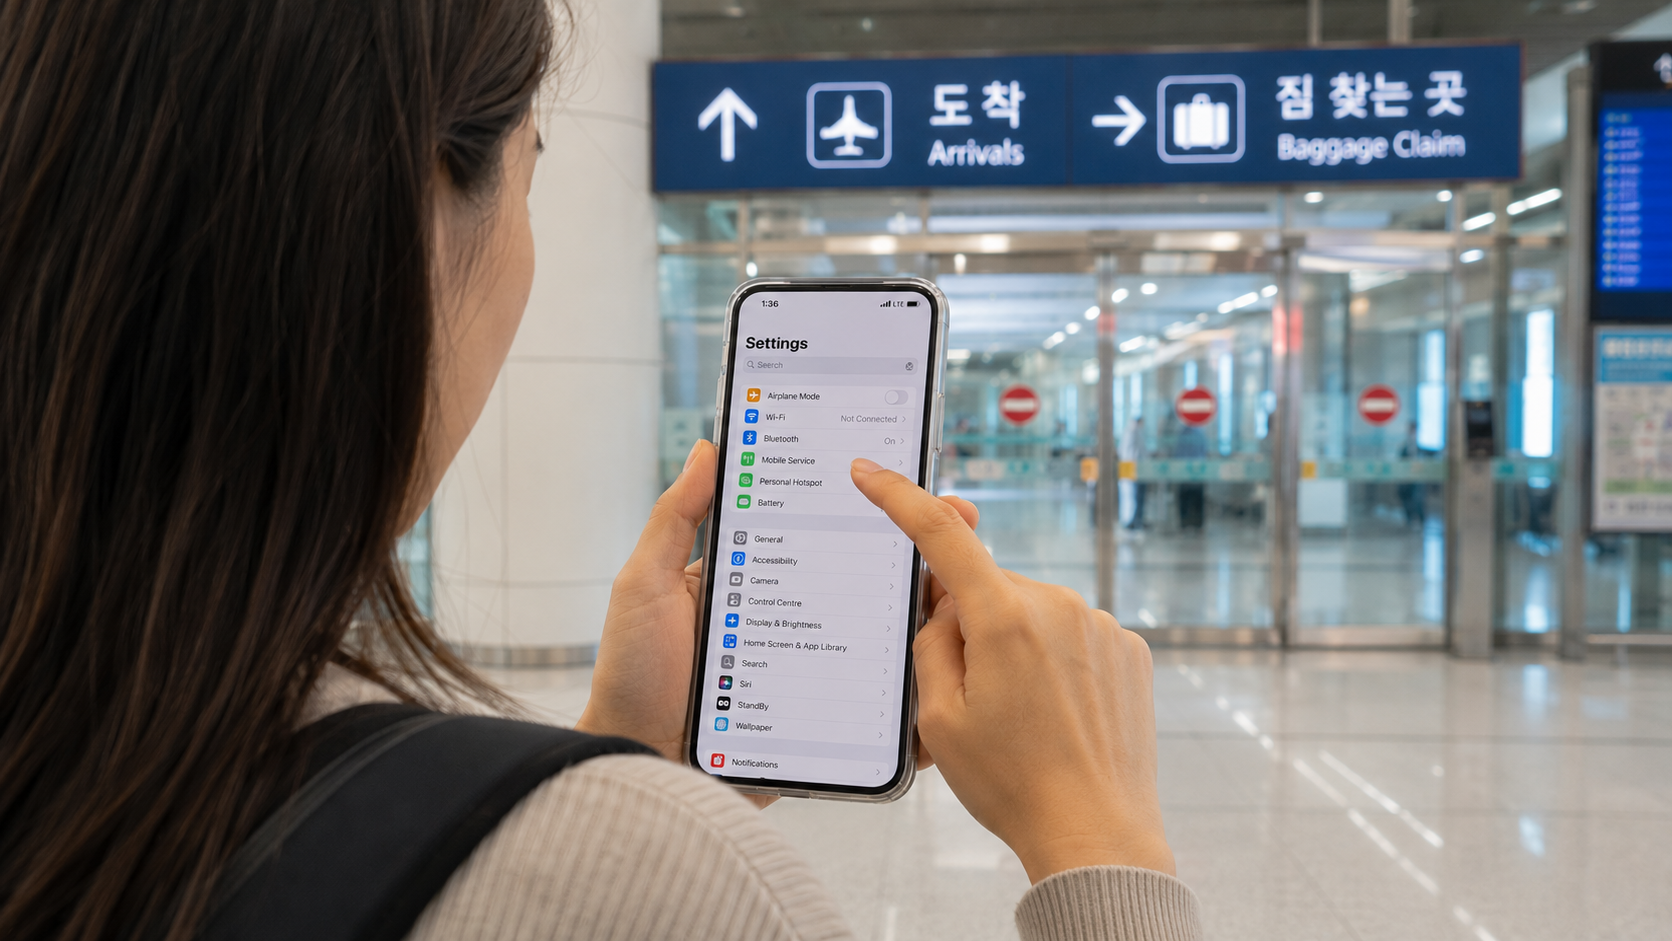
A Korea eSIM lets you connect to mobile data without replacing your physical SIM card. For most short-term visitors, setup takes only a few minutes, but you must confirm that your phone is unlocked, supports eSIM, and is configured to use the Korean line for data.
The most important precaution is timing: some Korean plans begin their validity period when you install or scan the eSIM, while others begin when the phone first connects in Korea. Read the provider's activation rule before installing it at home.
Prices, plan conditions, and activation rules in this guide were verified on June 9, 2026.
Quick answer
- Confirm that your phone supports eSIM and is not carrier-locked.
- Choose between a data-only plan and a plan with a Korean phone number.
- Buy from a Korean mobile operator or another established travel eSIM provider.
- Keep the QR code and setup instructions accessible offline.
- Install the eSIM according to the provider's activation rule.
- Select the Korean eSIM as your mobile-data line after arrival.
- Disable data roaming on your home SIM to avoid unexpected charges.
- Do not delete the Korean eSIM while it is still valid.
Is an eSIM suitable for your Korea trip?
An eSIM, short for embedded SIM, is a digital mobile-network profile installed on a compatible phone. It avoids airport collection lines and lets you keep your usual physical SIM in the device.
It is generally practical for travelers who need navigation, translation, messaging, ride-hailing, and internet access immediately after landing. A physical SIM may still be easier if your phone does not support eSIM, is locked to your home carrier, or has compatibility restrictions on Korean networks.
Data-only versus Korean-number plans
| Plan type | Mobile data | Korean phone number | Calls and SMS | Typical use |
|---|---|---|---|---|
| Data-only eSIM | Yes | Usually no usable voice number | No standard calls or SMS | Maps, messaging apps, browsing and app-based calls |
| Data, voice and SMS eSIM | Yes | Usually yes, often beginning with 010 | Depends on verification and prepaid balance | Reservations, local calls and receiving Korean SMS |
| International travel eSIM | Yes | Usually no Korean number | Usually no standard calls or SMS | Simple data access across one or more countries |
A data-only plan is sufficient if you communicate through WhatsApp, KakaoTalk, FaceTime or another internet-based service. Choose a voice-and-SMS product if you expect to call hotels, restaurants or local customer-service numbers.
A tourist number should not be treated as a full Korean identity-verification service. For example, LG U+ states that eligible voice-and-SMS products may receive verification messages for some restaurant or taxi apps, but cannot be used for banking or government identity verification. Data-only products cannot receive SMS verification. See the official LG U+ eSIM information.
Check your phone before buying
1. Confirm eSIM support
Menu names vary by operating-system version, region and manufacturer.
On an iPhone, open Settings > Cellular or Mobile Data and look for Add eSIM. Apple says current eSIM setup requires a compatible model, beginning with the iPhone XS, XS Max and XR generation, although regional model differences apply. Check Apple's current eSIM setup requirements.
On a Google Pixel, open Settings > Network & internet > SIMs > Add SIM and look for Set up an eSIM. Google's Pixel eSIM instructions explain the current menu path.
On a Samsung Galaxy device, the usual path is Settings > Connections > SIM manager > Add eSIM. Availability depends on the model, sales region and carrier firmware.
You can also dial *#06#. If the device information displays an EID, the phone contains eSIM hardware. This does not guarantee compatibility with every Korean product. LG U+, for example, currently warns that its visitor eSIM does not support Google Pixel or OPPO devices, even when those phones support eSIM generally.
2. Confirm that the phone is unlocked
An eSIM-capable phone can still be locked to the carrier that sold it.
On an iPhone, open Settings > General > About. Apple says an unlocked device displays No SIM Restrictions beside Carrier Lock. Android wording differs, so contact your current carrier if the status is unclear.
Request an unlock before departure. A Korean provider cannot normally remove a lock imposed by your home carrier.
3. Check dual-SIM behavior
If you want to keep your home number active, confirm that your phone can run the home SIM and Korean eSIM together. Only one line is normally selected as the primary mobile-data line.
Keeping the home line active can be useful for receiving messages, but your carrier may charge for calls, SMS or roaming activity. Check its rules before traveling.
Choosing a Korea eSIM
Compare the plan by total validity, speed policy, phone-number support, activation point and refund conditions rather than by the word “unlimited” alone.
Current Korean operator examples
The following examples are not endorsements. They illustrate how official visitor plans differ as of June 9, 2026.
| Operator | Selected published prices | Data policy | Important condition |
|---|---|---|---|
| KT | 1 day: KRW 6,500; 5 days: KRW 27,500; 10 days: KRW 38,500; 30 days: KRW 71,500 | 3GB each day, followed by service at up to 5Mbps until the daily reset | KT states that the period is calculated in 24-hour units from installation |
| SK Telecom | 2 days: KRW 12,000; 5 days: KRW 27,500; 10 days: KRW 38,500; 30 days: KRW 71,500 | Its data, call and SMS plan advertises unlimited LTE data at speeds up to 100Mbps | Validity is calculated in 24-hour units from QR-code scanning |
| LG U+ | 1 day: KRW 6,500; 3 days: KRW 18,000; 5 days: KRW 27,500 | Published data-only options include unlimited LTE or 5G products | The usage period begins with the first data use, according to the current product page |
See the official KT visitor eSIM service, SK Telecom eSIM plans, and LG U+ eSIM product page for current details.
Because activation rules differ, do not assume that every QR code can be installed several days before departure. KT and SK Telecom currently tie validity to installation or QR scanning for the cited products. LG U+ says its cited data product begins at first data use. Recheck the exact rule during checkout.
Questions to ask before paying
- Does the plan work on your exact phone model and sales region?
- Does validity begin at installation, first network connection or first data use?
- Is the duration measured by calendar day or consecutive 24-hour periods?
- Is the plan genuinely unlimited, or does it slow after a daily allowance?
- Does it include a Korean 010 number?
- Can it receive calls and SMS before passport verification?
- Are outgoing calls included, or do they require a prepaid top-up?
- Can the plan be extended?
- How long can you wait between purchase and activation?
- Is a refund possible after downloading or installing the profile?
Refund rules can be strict. KT states that completed eSIM purchases are not refundable. LG U+ states that its data eSIM cannot be refunded after payment. SK Telecom publishes limited same-day refund conditions for an unused data, call and SMS plan. Confirm the terms shown for your specific product before paying.
When to install the eSIM
Follow the provider's written instructions rather than a general travel rule.
If installation immediately starts the paid period, wait until shortly before departure or until you reach Korea and have reliable Wi-Fi. Incheon International Airport provides terminal Wi-Fi, but keeping the QR code and manual activation details offline gives you a fallback if airport connectivity is busy or unavailable.
If the provider explicitly permits advance installation without starting validity, installing at home can reduce arrival-day problems. Leave the line switched off until needed and verify that your home SIM remains the data line.
Do not scan a single-use QR code merely to test it. KT, LG U+ and SK Telecom all warn in different terms that deleted or previously installed profiles may not be recoverable without purchasing another eSIM.
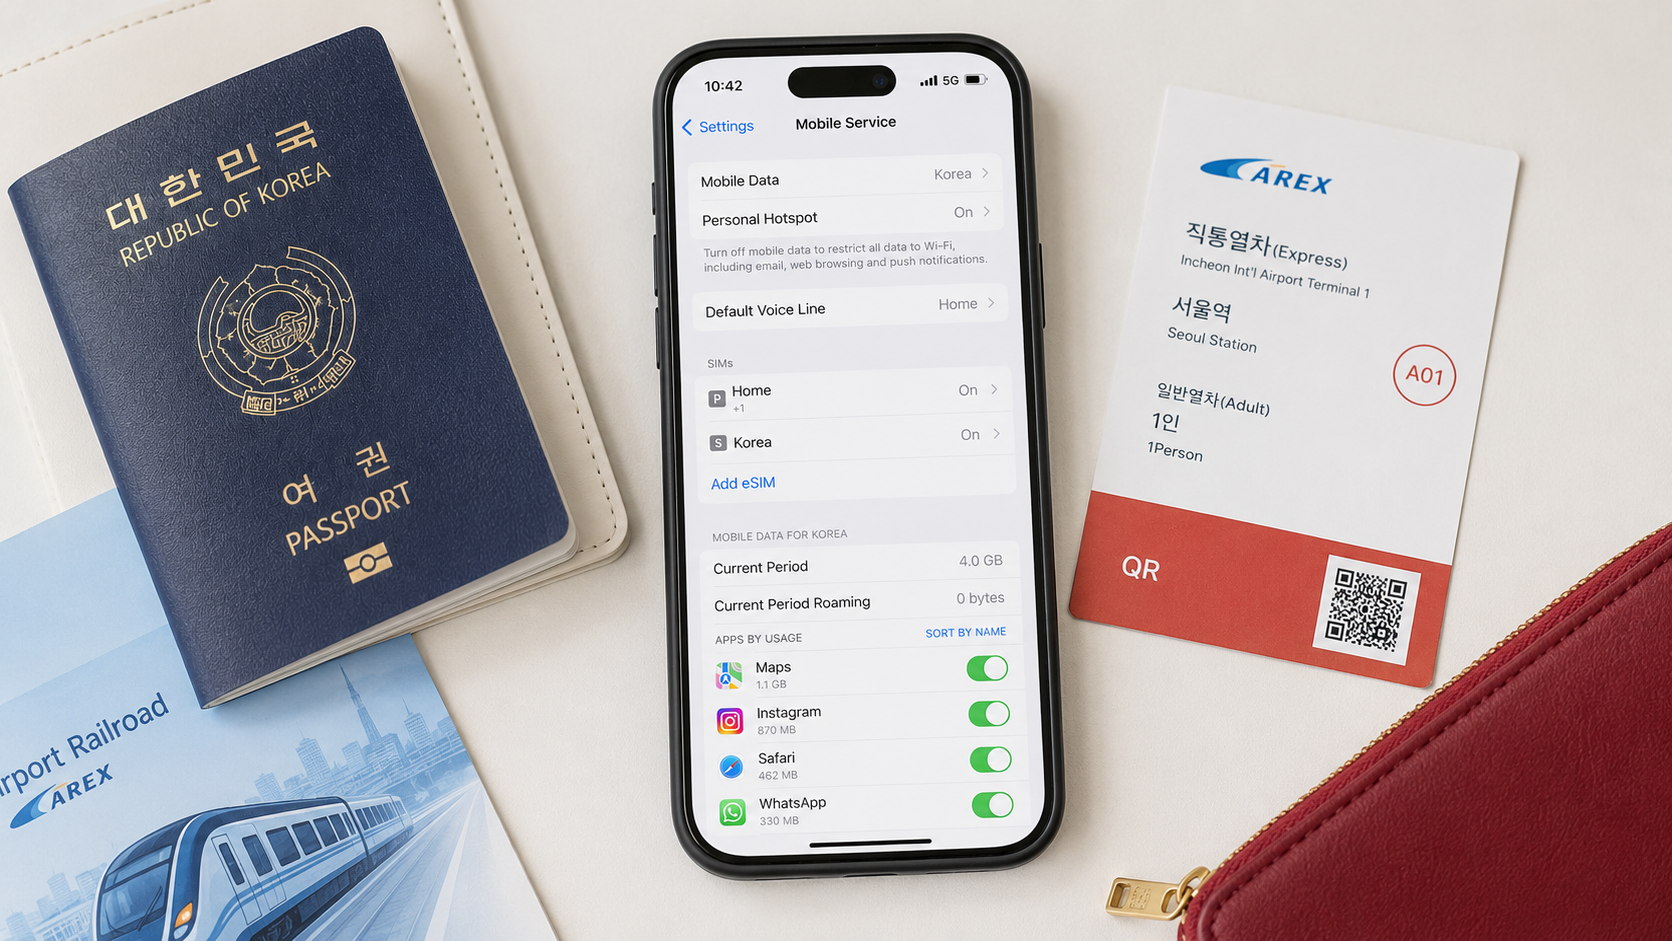
How to install a Korea eSIM on iPhone
- Connect the iPhone to Wi-Fi.
- Open Settings > Cellular or Mobile Data.
- Tap Add eSIM.
- Select Use QR Code and scan the provider's code.
- Follow the prompts to add the cellular plan.
- Give the line a clear label such as Korea.
- Keep your home line as the default voice line if you still need it.
- Select Korea for cellular data when you are ready to activate the plan.
- Turn off Allow Cellular Data Switching unless you deliberately want the phone to fall back to your home line.
- Open the home line's settings and turn off its Data Roaming option.
Apple also allows QR codes received in a supported email app or browser to be added by touching and holding the image on recent iOS versions. See Apple's official QR-code instructions.
Whether data roaming should be enabled on the Korean eSIM depends on the product. Some international eSIMs require it because they connect through a roaming partner. A direct Korean-operator eSIM may not. Follow the provider's setup screen or voucher.
How to install a Korea eSIM on Android
Samsung Galaxy
- Connect to Wi-Fi.
- Open Settings > Connections > SIM manager.
- Tap Add eSIM.
- Choose the option to scan a carrier QR code.
- Scan the code and approve the installation.
- Label the new line Korea if the phone allows it.
- In SIM manager, select the Korean eSIM for mobile data.
- Disable data roaming on your home SIM.
- Enable roaming on the Korean eSIM only if its provider requires it.
Google Pixel
- Open Settings > Network & internet > SIMs.
- Tap Add SIM > Set up an eSIM.
- Follow the QR-code or provider setup instructions.
- Return to the SIM menu and select the Korean eSIM for mobile data.
- Turn off the home SIM temporarily if you do not need calls or messages from it.
Google notes that menu availability depends on the device and carrier. More importantly, check the Korean operator's device list before buying: an eSIM-compatible Pixel is not necessarily supported by every visitor plan.
Passport verification and Korean phone numbers
Korean visitor products with calls and SMS may require passport verification after immigration clearance. Data service can have different verification rules from voice service.
SK Telecom currently allows data use before passport verification, but blocks incoming and outgoing calls and SMS until verification is complete. Its online verification service operates from 8:00 a.m. to 10:00 p.m. Korea Standard Time; outside those hours, travelers are directed to an airport roaming center. See the SK Telecom passport verification instructions.
KT states that voice top-ups and voice or SMS functions require identity and entry verification, which can be completed at an airport KT roaming center. Check the instructions attached to your exact KT product.
Keep your passport name, passport number, order number and assigned Korean number available. Enter your name exactly as instructed, usually matching the passport's Roman-letter spelling.
Troubleshooting after arrival
The eSIM appears, but there is no data
Work through these checks in order:
- Confirm that the Korean eSIM is switched on.
- Confirm that it is selected for mobile data.
- Check the provider's instruction about data roaming.
- Turn airplane mode on for about 10 seconds, then turn it off.
- Restart the phone.
- Set network selection to automatic unless the provider names a specific network.
- Check whether the provider supplied an APN and enter it exactly if required.
- Confirm that the plan has started and has not expired.
Do not delete the profile as an early troubleshooting step. Contact the provider first because the QR code may be single-use.
The phone shows data, but calls or SMS do not work
You may have bought a data-only plan, may need a voice balance, or may not have completed passport verification. Check the voucher's product name and verification status.
The QR code will not scan
Display it on another phone, tablet or computer rather than trying to scan a code shown on the same screen. On supported recent iPhones, touching and holding a QR code in an email or browser may show an Add eSIM option.
If the provider supplied an SM-DP+ address and activation code, use the manual-entry option. Do not repeatedly scan the code on different phones; many Korean visitor eSIMs cannot be transferred after installation.
Common mistakes to avoid
- Buying before checking the exact model and regional variant of the phone.
- Assuming that an unlocked physical-SIM slot guarantees eSIM support.
- Installing a plan early when installation starts the validity clock.
- Leaving the home SIM selected for mobile data.
- Enabling data switching and accidentally using expensive home-carrier roaming.
- Buying data-only service when a Korean number is needed for calls or SMS.
- Expecting a tourist number to support Korean banking or government identity checks.
- Deleting the eSIM when restarting the phone would have been enough.
- Relying on the QR code only in an email that cannot be opened without internet access.
What to check before you go
- Phone supports eSIM
- Phone is carrier-unlocked
- Exact model is accepted by the chosen Korean provider
- Plan length covers the full trip
- Activation timing is understood
- Speed reduction or fair-use policy is acceptable
- Voice, SMS and Korean-number requirements are covered
- Passport-verification procedure is understood
- QR code and order number are stored securely offline
- Provider's support page and contact details are saved
- Home-carrier roaming charges have been checked
- Important maps, hotel details and transport directions are downloaded offline
Your next step should be to open your phone's SIM settings and confirm that Add eSIM is available. Then compare the activation point, device restrictions and phone-number features on the official operator pages before purchasing.
Sources
- KT official visitor eSIM service
- SK Telecom official eSIM plans
- SK Telecom passport verification guide
- LG U+ official Korea eSIM product information
- Apple Support: Set up eSIM on iPhone
- Apple Support: Use eSIM while traveling internationally
- Google Pixel Help: Set up a new eSIM
- Google Pixel Help: Use dual SIMs